
Imagine starting your day with a burst of vibrant color and a flavor that brings back the warmth of childhood memories. With this red velvet pancake recipe, you have the perfect opportunity to transform an ordinary breakfast into a delightful experience that feels both indulgent and comforting. In this guide, you’ll learn how to create these eye-catching pancakes from scratch, mastering each step along the way to achieve that perfect blend of taste and texture. Whether you’re a novice in the kitchen or simply looking for a creative twist on your morning routine, you’re about to embark on a culinary journey that celebrates both beauty and flavor.
Table of Contents
Introduction to Red Velvet Pancakes
Red velvet pancakes are more than just a meal—they’re an experience. You might have encountered the classic red velvet cake at celebrations, but these pancakes bring that signature color and subtle cocoa flavor into your everyday life. This dish is a modern twist on traditional pancakes, adding a pop of color to your plate and a touch of decadence to your morning ritual.
What Makes Red Velvet Pancakes Unique?
- They combine the rich, smooth flavor of cocoa with a vibrant red hue.
- The soft, fluffy texture paired with a hint of tanginess from buttermilk makes them irresistible.
- Perfect for a festive brunch or a special breakfast treat that turns an ordinary morning into an extraordinary one.
In this guide, you’ll not only learn how to make these pancakes but also discover tips and tricks to customize the recipe to your taste, ensuring every bite is just as delightful as the last.
Essential Ingredients and Tools
Before you dive into the recipe, it’s important to have all your ingredients and tools ready. This ensures that your cooking process is smooth, efficient, and enjoyable.
Ingredients Needed for Red Velvet Pancakes
Quality ingredients make all the difference in achieving that perfect red hue and delicate flavor balance. Here’s a detailed list of what you’ll need:
| Ingredient | Quantity | Notes |
|---|---|---|
| All-purpose flour | 1 1/2 cups | Sifted for a smoother texture |
| Cocoa powder | 2 tbsp | Unsweetened, for authentic flavor |
| Baking soda | 1 tsp | Ensures a light, fluffy texture |
| Salt | 1/2 tsp | Enhances overall flavor |
| Buttermilk | 1 1/4 cups | For moist, tender pancakes |
| Eggs | 2 large | Room temperature for better blending |
| Red food coloring | 1-2 tbsp | Adjust intensity to preference |
| Sugar | 2 tbsp | For a subtle sweetness |
| Vanilla extract | 1 tsp | Adds depth to the flavor |
Essential Kitchen Tools
To achieve the best results, make sure you have these kitchen tools on hand:
- Mixing Bowls and Measuring Cups: Accurate measurements are crucial for a balanced batter.
- Whisk and Spatula: Use a whisk to blend your ingredients evenly, and a spatula to gently fold them together.
- Non-Stick Skillet or Griddle: This ensures that your pancakes cook evenly without sticking, making flipping easier.
- Optional – Food Processor: If you prefer an ultra-smooth batter, a food processor can be a great addition.
Having these tools ready not only speeds up the process but also helps you avoid common pitfalls like overmixing, which can lead to dense pancakes.
Step-by-Step Red Velvet Pancake Recipe
Creating the perfect red velvet pancake might seem daunting, but breaking it down into manageable steps makes the process enjoyable and stress-free. Follow these simple instructions to create a batch of pancakes that are as beautiful as they are delicious.
Preparing the Batter
- Mix the Dry Ingredients:
In a large bowl, combine the sifted all-purpose flour, cocoa powder, baking soda, and salt. Sifting is key to removing any lumps and ensuring an even distribution of cocoa throughout the mixture. - Blend the Wet Ingredients:
In a separate bowl, whisk together the buttermilk, eggs, red food coloring, sugar, and vanilla extract. The red food coloring is what gives your pancakes their signature hue, so adjust it to match your preferred intensity. - Combine the Mixtures:
Gently fold the wet ingredients into the dry mixture. Be careful not to overmix—the goal is to maintain a light, airy batter that will yield fluffy pancakes. A few lumps are perfectly fine. - Let the Batter Rest:
Allow the batter to sit for about 5 minutes. This resting period helps the ingredients meld together and results in a tender, well-formed pancake.
Pro Tip: Avoid overmixing at all costs. Overworking the batter can lead to tough pancakes, negating the light and fluffy texture you’re aiming for.
Cooking the Pancakes
Now that your batter is ready, it’s time to cook. Follow these steps to ensure each pancake is perfectly cooked:
- Preheat Your Skillet:
Set your non-stick skillet or griddle to medium heat. A properly heated surface ensures that your pancakes cook evenly without burning. - Form the Pancakes:
Using a ladle or measuring cup, pour the batter onto the skillet, forming pancakes of your desired size. Remember, consistency in size helps them cook uniformly. - Watch for Bubbles:
As the pancakes cook, bubbles will form on the surface. Once these bubbles begin to burst, it’s time to flip. This usually takes about 2-3 minutes on one side. - Flip and Finish Cooking:
Carefully flip each pancake using your spatula and cook for another 1-2 minutes on the other side until you achieve a golden-brown finish. - Adjust Heat if Needed:
If you notice the pancakes browning too quickly, reduce the heat slightly to ensure a thorough, even cook throughout.
Remember: Cooking times can vary based on your stove and skillet type. It might take a little practice to perfect your timing, so don’t be discouraged if your first batch isn’t flawless.
Creative Variations and Serving Suggestions
One of the joys of cooking is the ability to make a recipe your own. Once you’ve mastered the basic red velvet pancake, you can experiment with a variety of creative twists and serving suggestions.
Customizing Your Red Velvet Pancakes
There are many ways to put your personal stamp on this recipe:
- Add a Cream Cheese Swirl:
Before cooking, gently swirl in a bit of cream cheese to create pockets of creamy goodness throughout your pancake. - Experiment with Toppings:
Consider adding edible glitter or cocoa nibs for a unique presentation, especially if you’re serving these pancakes at a festive brunch. - Alternative Flours:
If you’re looking for a gluten-free option, try using almond or oat flour. These alternatives can provide a slightly different texture and flavor, perfect for those with dietary restrictions.
Key Insight: Each variation can subtly alter the flavor and texture of your pancakes. Try small tweaks first, and adjust based on your preferences and feedback from family or guests.
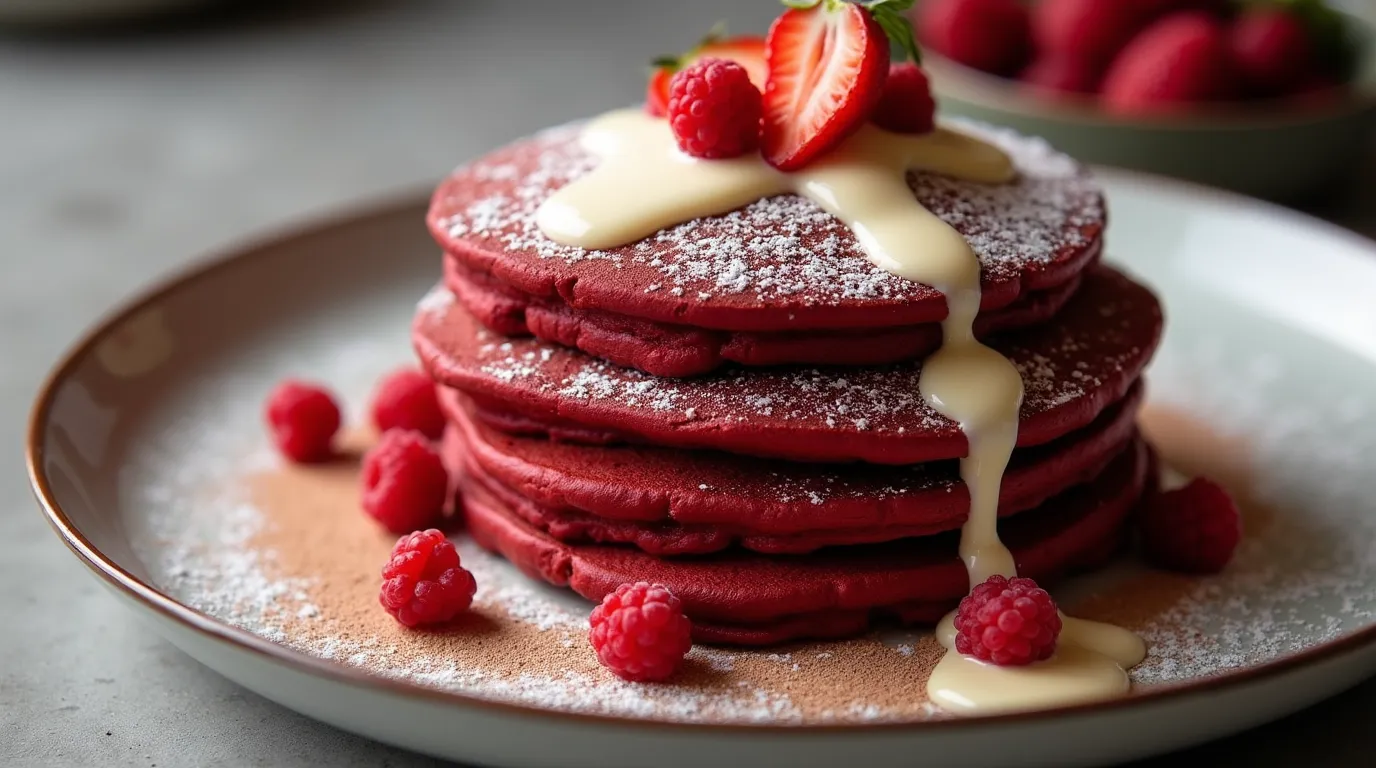
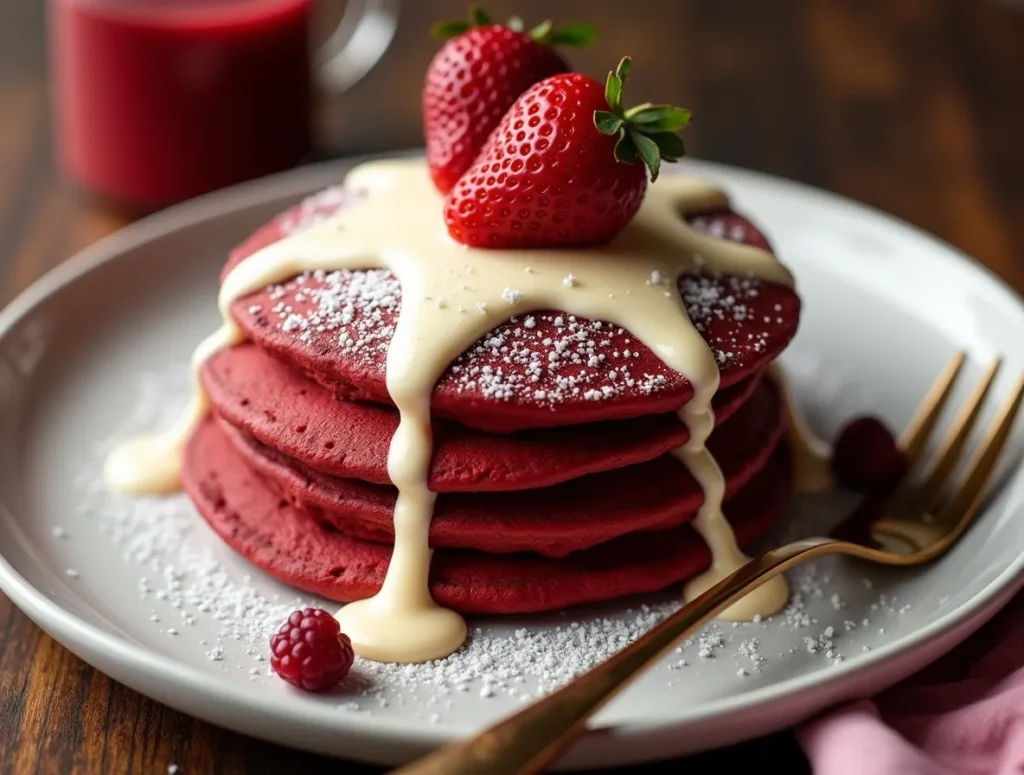
Serving Ideas and Toppings
A well-crafted pancake deserves equally thoughtful toppings. Here are some ideas to elevate your red velvet pancakes to a new level of indulgence:
- Cream Cheese Icing:
Drizzle a homemade cream cheese icing over your pancakes for an extra burst of flavor and creaminess. - Fresh Berries:
Add a serving of fresh strawberries, blueberries, or raspberries to bring a refreshing contrast to the rich, velvety flavor. - Powdered Sugar:
A light dusting of powdered sugar can enhance the presentation and add a touch of sweetness. - Maple Syrup:
A classic accompaniment, maple syrup provides a balanced sweetness that complements the subtle cocoa notes.
Quick Tips:
- Experiment with seasonal fruits to keep your recipe fresh throughout the year.
- Consider a side of whipped cream or a sprinkle of cocoa powder for added texture and flavor.
Troubleshooting and Pro Tips
Even the best chefs encounter hiccups. Here are some common challenges and expert advice to help you achieve the perfect red velvet pancake every time.
Common Mistakes and How to Avoid Them
- Overmixing the Batter:
Mixing too vigorously can lead to dense, rubbery pancakes. Gently fold the ingredients until just combined. - Incorrect Heat Settings:
If your skillet is too hot, your pancakes may brown too quickly on the outside while remaining undercooked inside. Always preheat your skillet to medium heat and adjust as necessary. - Miscalculating Ingredients:
Precision is key in baking and pancake making. Invest in good measuring cups and spoons to ensure accuracy, especially when using ingredients like red food coloring, where a little goes a long way.
Pro Tips for Perfect Red Velvet Pancakes
- Non-Stick Pan:
Always use a non-stick pan or lightly grease your skillet to ensure easy flipping and removal. - Room Temperature Ingredients:
Using ingredients that are at room temperature can help in achieving a smoother, more homogenous batter. - Practice Makes Perfect:
The first batch might not be picture-perfect. Use it as a learning experience and tweak your process for the next round.
These tips, drawn from culinary experts and seasoned home cooks, are designed to help you troubleshoot common issues and refine your technique until you’re cooking with confidence.
FAQ About Red Velvet Pancakes
Below are some frequently asked questions that address common concerns and help you get the most out of your red velvet pancake experience.
Q: What makes a red velvet pancake different from a regular pancake?
A: Red velvet pancakes incorporate cocoa and red food coloring, resulting in a unique color and a hint of chocolatey flavor that sets them apart from traditional pancakes.
Q: Can I make red velvet pancakes vegan?
A: Yes, you can easily modify the recipe. Simply substitute dairy milk with a plant-based alternative such as almond or soy milk, and replace eggs with a flax egg (1 tablespoon of flaxseed meal mixed with 3 tablespoons of water).
Q: How do I achieve the perfect red hue for my red velvet pancake?
A: The key is using a high-quality red food coloring and adjusting the amount based on your taste and desired intensity. Too little may result in a pale color, while too much can overwhelm the flavor.
Q: What are some recommended toppings for red velvet pancakes?
A: Cream cheese icing, fresh berries, powdered sugar, and maple syrup are popular choices that complement the rich flavor of the pancakes.
Conclusion
In wrapping up your red velvet pancake journey, remember that this recipe is more than just a set of instructions—it’s an invitation to experiment, innovate, and enjoy the process of cooking. You’ve learned the importance of selecting quality ingredients, the benefits of the proper tools, and the art of balancing flavors and textures to create something truly memorable.
Every time you prepare these pancakes, you’re not just making breakfast—you’re crafting an experience that can transform an ordinary morning into a celebration of taste and creativity. As you serve these pancakes to your family or guests, relish in the compliments and the smiles they bring. And don’t hesitate to share your variations or ask questions. After all, cooking is a journey that becomes even more rewarding when you share it with others.
Call-to-Action
Now it’s your turn! Gather your ingredients, set up your kitchen, and dive into making your own batch of red velvet pancakes. Share your creations on social media with the hashtag #RedVelvetPancakeMagic, and let your friends and family in on the secret of your delightful breakfast innovation. If you have any questions or want to share your personal tweaks, leave a comment below. Happy cooking, and here’s to many delicious mornings ahead!
By following this comprehensive guide, you’ve now mastered not just a recipe, but a creative art form that blends the familiar comforts of breakfast with the playful elegance of red velvet. Enjoy every bite, and let your culinary journey continue to inspire your kitchen adventures.